Microsegmentation
This guide explains microsegmentation and shows you how to use Calico network policy to isolate and protect containerized applications.
You can get started with Calico by following our quickstart guide. You'll learn how to install Calico, secure a cluster with network policy, and monitor network traffic with Calico Whisker.
Overview
What is microsegmentation?
Microsegmentation brings network segmentation into containerized environments, giving you fine-grained isolation in Kubernetes. Unlike older methods that focus on perimeter security, microsegmentation uses network policies to secure assets at a more precise level — from workloads to namespaces — based on label selectors. By limiting which segments can talk to each other, it isolates critical security domains, stops lateral movement, and helps you meet compliance requirements.
Why use Calico for microsegmentation?
If you need to segment containerized systems, you can use Calico's network policies to isolate and secure workloads, namespaces, tenants, and hosts. Traditional firewalls weren't built for dynamic, containerized environments. Microsegmentation uses purpose-built network policies that let you secure workloads, applications, namespaces, or clusters at different levels of detail.
Calico has features that make microsegmentation in Kubernetes easier and faster.
In open-source Calico (Project Calico) and commercial Calico products, you use Calico network policy, which extends Kubernetes network policy. Key features include protecting more endpoint types, writing global policies that apply cluster-wide, and additional policy actions like deny and log.
Commercial Calico products (Calico Enterprise and Calico Cloud) complement these policy features with a browser-based UI that includes observability, policy management, policy recommendations, and more.
The rest of this document describes these features and how to implement microsegmentation with Calico.
Microsegmentation at different levels
Organizations typically segment Kubernetes environments at three levels: Workload Isolation, Namespace Isolation, and Tenant Isolation.
Workload isolation
Network policies secure specific microservices within a tenant or namespace. Isolating workloads reduces the attack surface and prevents lateral movement between them. A workload isolation policy has stricter ingress and egress rules that only allow essential communication between microservices. For example, an application might have frontend and backend workloads in the same namespace. If the frontend is public and more likely to be breached, restrict communication between the frontend and backend. If the frontend is compromised, the attacker is far less likely to reach sensitive data in the backend. Namespace-level perimeter security alone is not enough in this case.
Namespace isolation
In Kubernetes, namespaces separate applications and processes from each other. This prevents conflicts between applications that run on the same system and may be owned by different users. When you isolate and secure applications in their namespaces, each application runs independently without affecting other namespaces in the cluster. If one application is compromised, isolated namespaces contain the blast radius of that threat.
Tenant isolation
When tenants share cluster infrastructure, you may have an organizational or compliance requirement to isolate them. A tenant can contain workloads or namespaces (secured or not), and still need perimeter security at the tenant level. This protects each tenant from lateral movement where an attacker might try to steal high-value assets or misuse applications. If one tenant is compromised, the risk to other tenants on the same infrastructure drops significantly.
Foundational concepts for microsegmentation
Before you implement a segmentation strategy, you need to understand a few key concepts:
- Security domains
- Network security
- Default deny
Calico Enterprise and Calico Cloud users have additional features that make microsegmentation faster and easier.
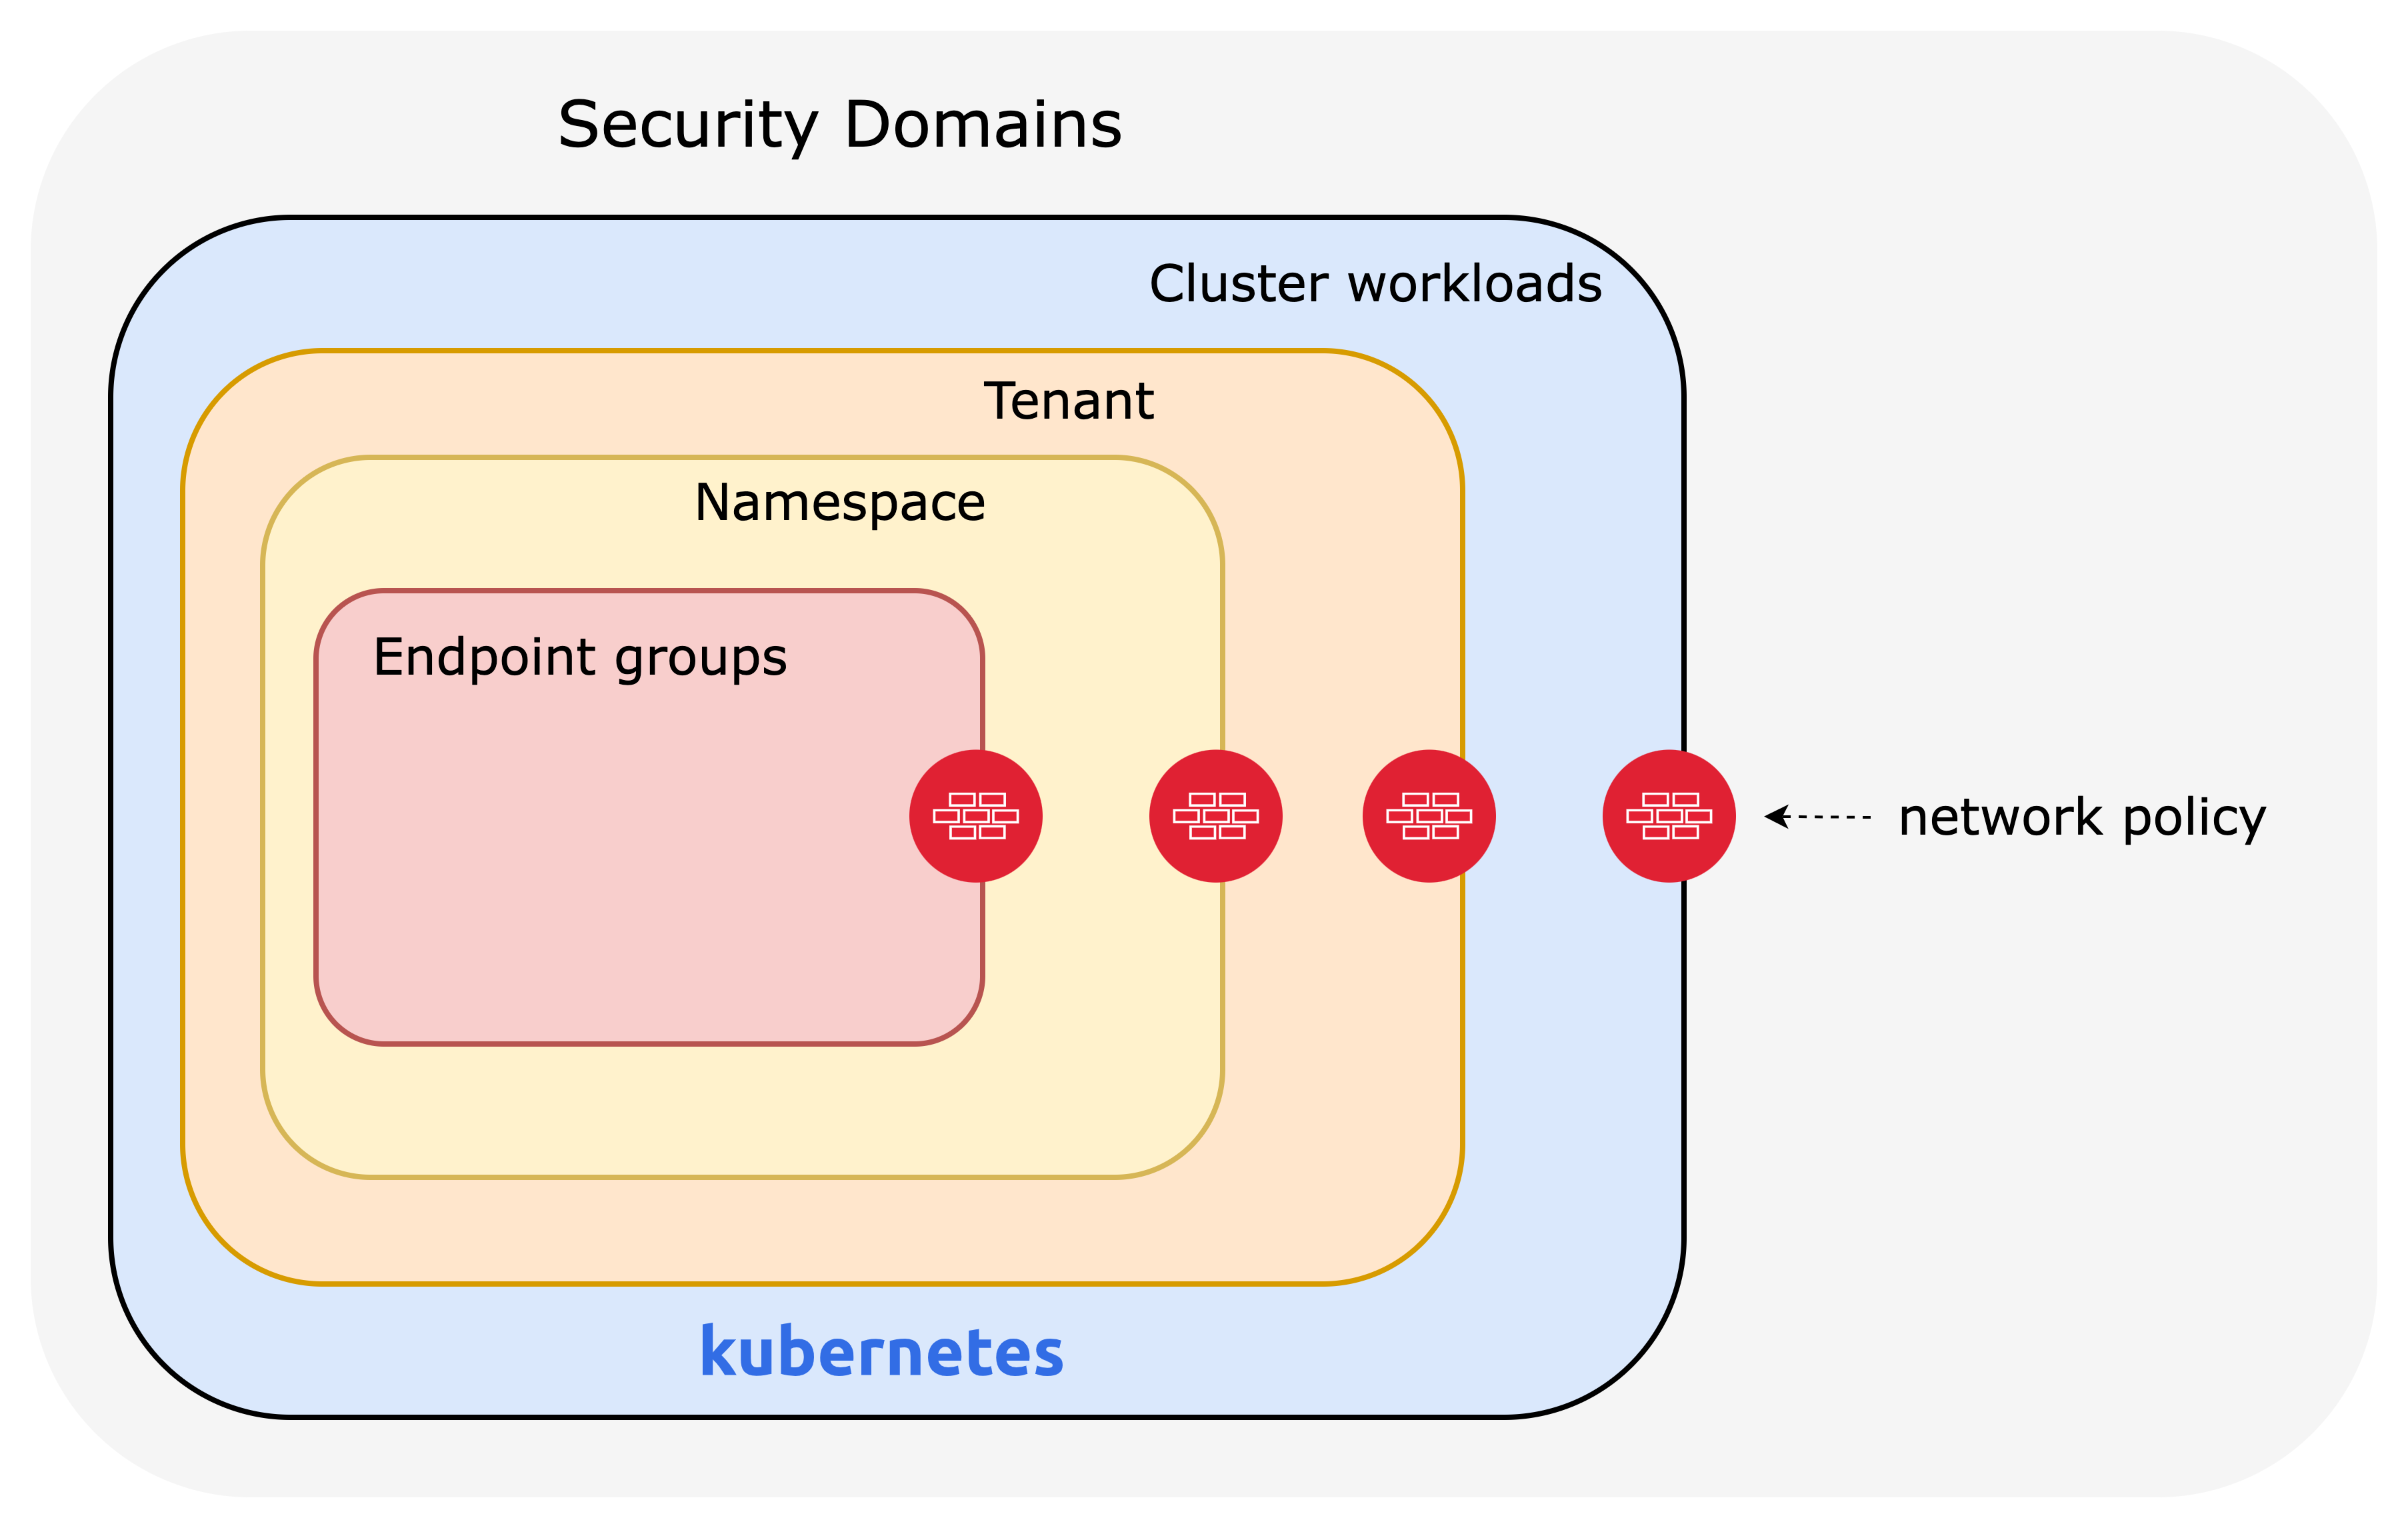
Security domains
Before you start, identify all the security domains you need to protect. A security domain can be any of the following:
Clusters: The cluster can be considered a security domain.
Tenants: Each tenant is a separate security domain. A tenant is a team or group of individuals who share the same Kubernetes infrastructure. It is a collection of applications or namespaces with a specific security policy.
Namespaces: The microservices that make up an application are usually grouped in a single namespace, which you can treat as a security domain. For example, you might protect one application from other applications in the cluster or the same tenant.
Endpoints: A microservice is made up of endpoint groups like Deployments, StatefulSets, and DaemonSets. Even microservices in the same namespace should be protected from each other to limit exposure if one is compromised. For example, a frontend and a backend microservice in the same namespace are separate security domains and need their own network policies.
Calico's enhanced network policy capabilities
You achieve segmentation by writing network policies that secure each domain at the right level of detail for your security posture and compliance needs.
Calico’s network policies offer more features than standard Kubernetes network policies. They include:
- policy ordering/priority
- deny rules
- more flexible match rules
- applicable to multiple endpoints (pods, VMs, and host interfaces).
See the full list of Calico network policy features. The Kubernetes docs describe what network policies can and cannot do.
Project Calico integrates with Istio for application-layer security and service mesh. This integration adds layer 5–7 policy match criteria, end-to-end mTLS encryption, and cryptographic identity. For more information, read this blog about integrating Kubernetes RBAC and Calico for shift-left security.
Calico network policies are:
- Declarative — you define security rules in YAML files or through the Calico Cloud or Enterprise web console.
- Label-based — policies target endpoints by workload identity using label selectors, which you can combine into complex expressions.
- Dynamic — policies follow workloads by identity, not by IP address.
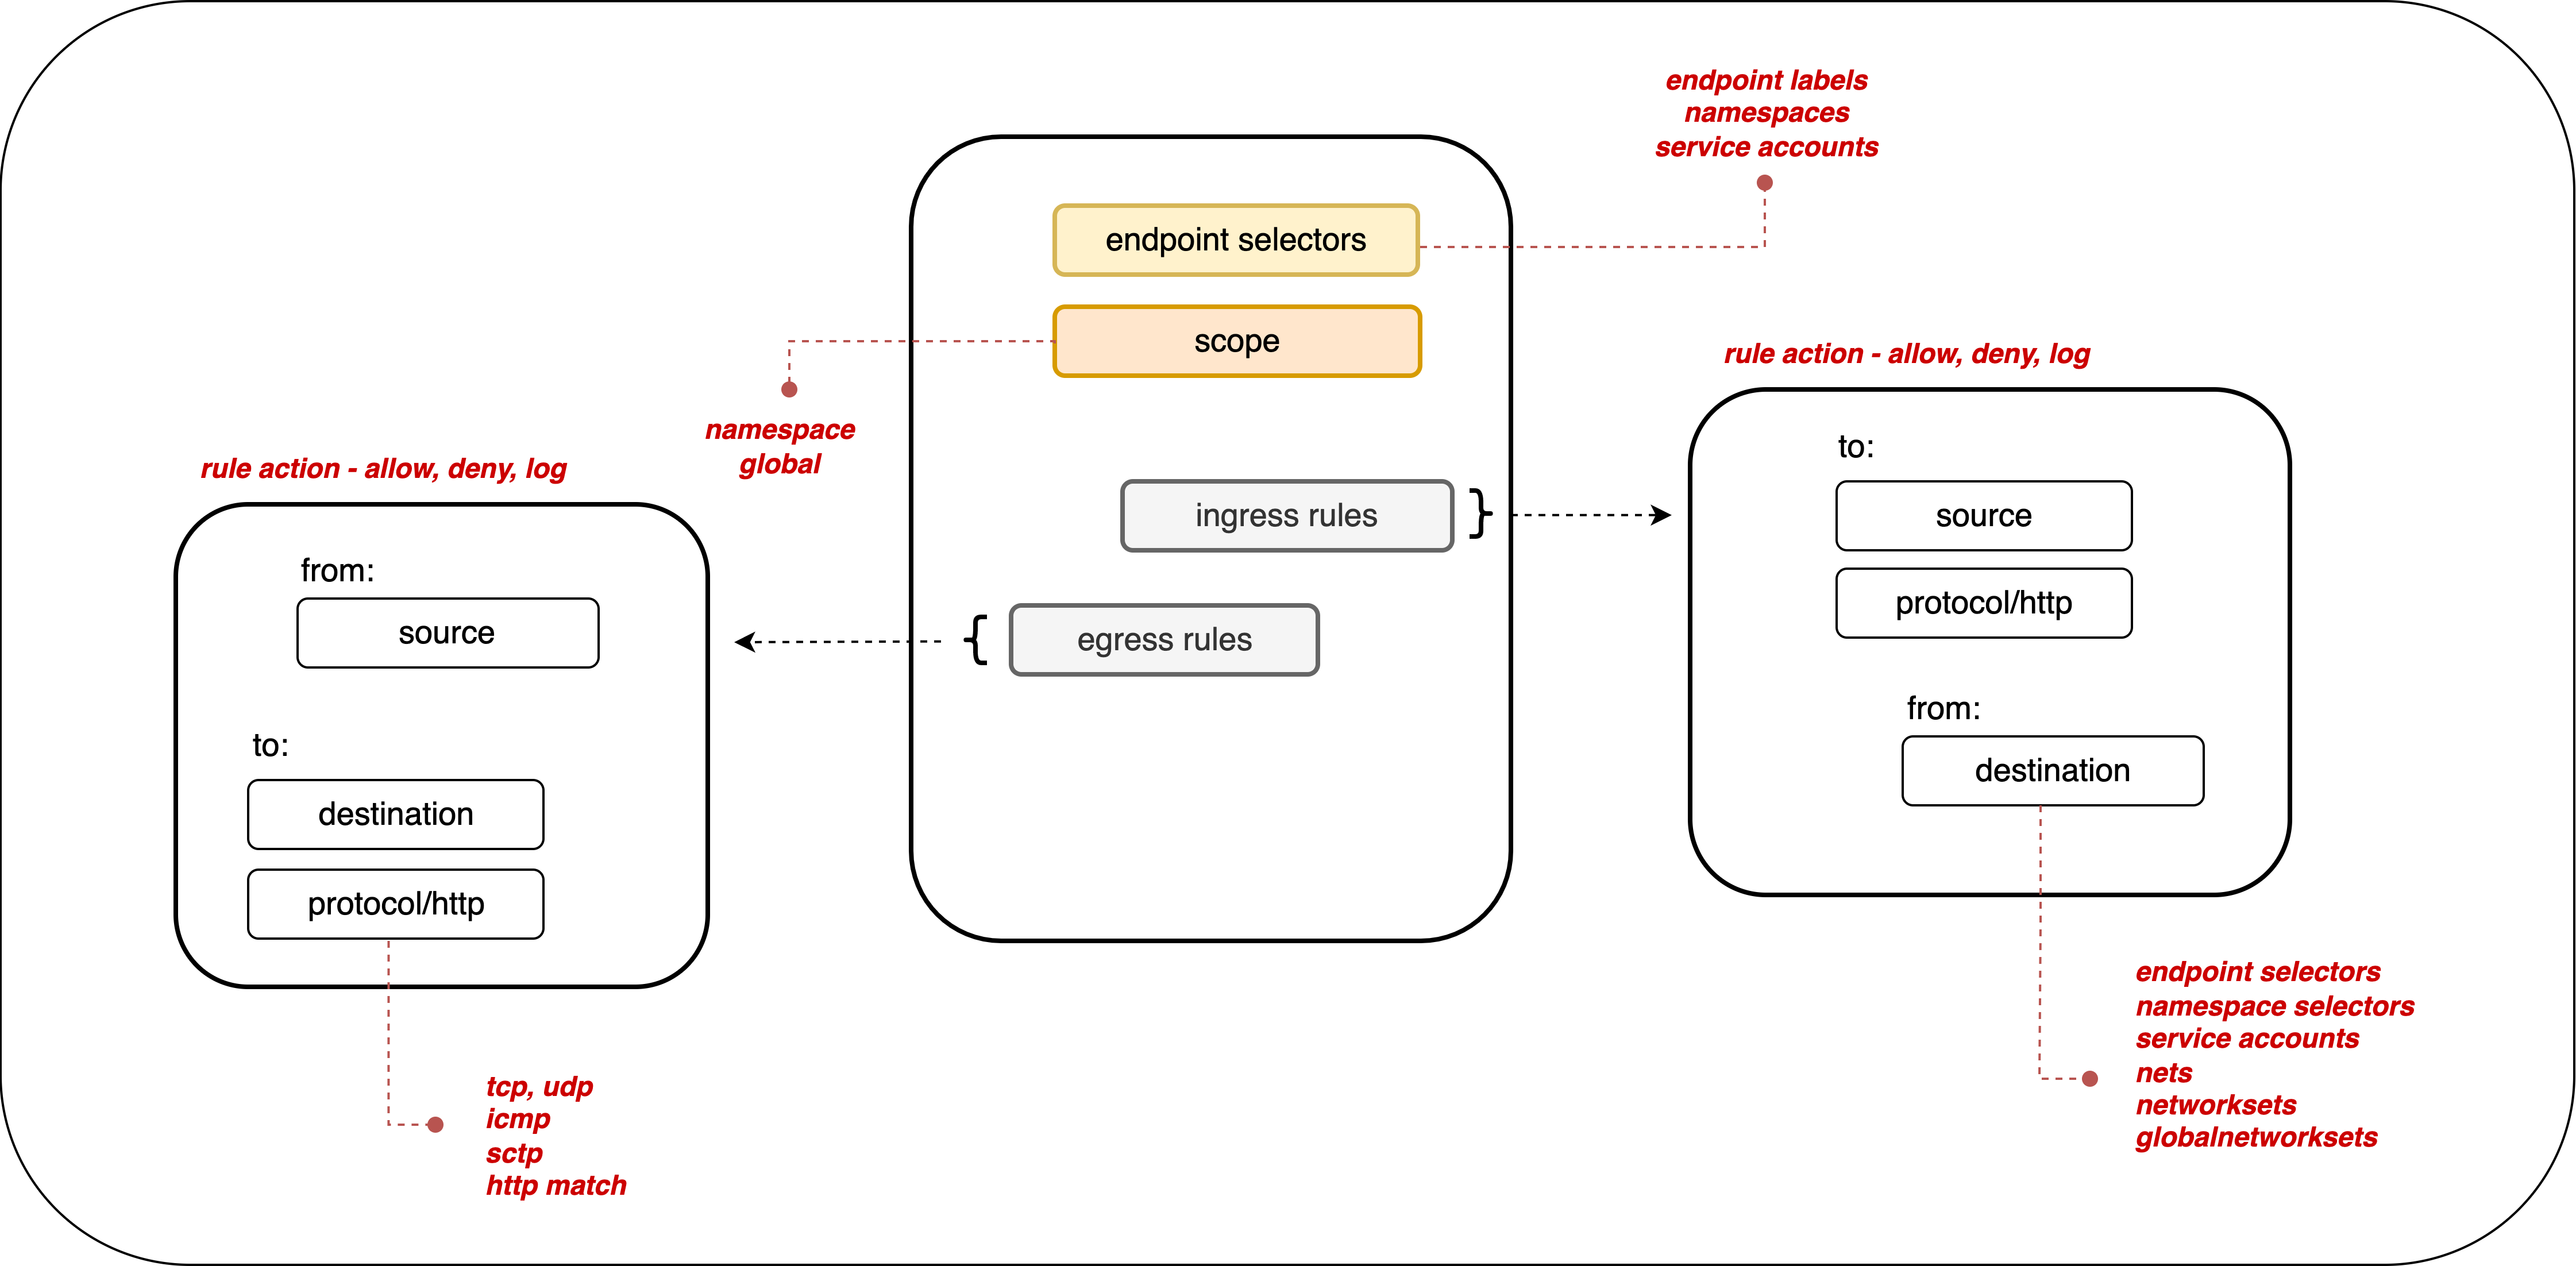
All Calico products support label-based policies at namespace or cluster-wide (global) scope.
By default, if no policies exist, all ingress and egress traffic is allowed to and from pods in that namespace.
Default deny
Kubernetes allows all traffic by default unless a policy restricts it. We recommend creating a default deny policy for your pods. This ensures that traffic to or from a pod is denied unless another policy explicitly allows it.
An implicit default deny policy always runs last. If any other policy allows the traffic, the deny has no effect. The deny only applies after all other policies are evaluated.
A global default deny means you don't need to create a deny policy every time you add a namespace. It also forces cluster tenants to create a network policy for every new pod. Make sure you have the right allow policies in place so that control plane traffic is not blocked.
Additional functionality with Calico Enterprise and Calico Cloud
Calico Enterprise and Calico Cloud add hierarchical tiered policies, automatic policy recommendations (including namespace isolation) based on observed traffic, and integrations with third-party firewalls. You can view and manage policies through a UI, and stage policies to preview their impact before you enforce them.
To get similar behavior to tiers in Project Calico, read this blog.
These features help you manage policies at scale and implement microsegmentation more efficiently.
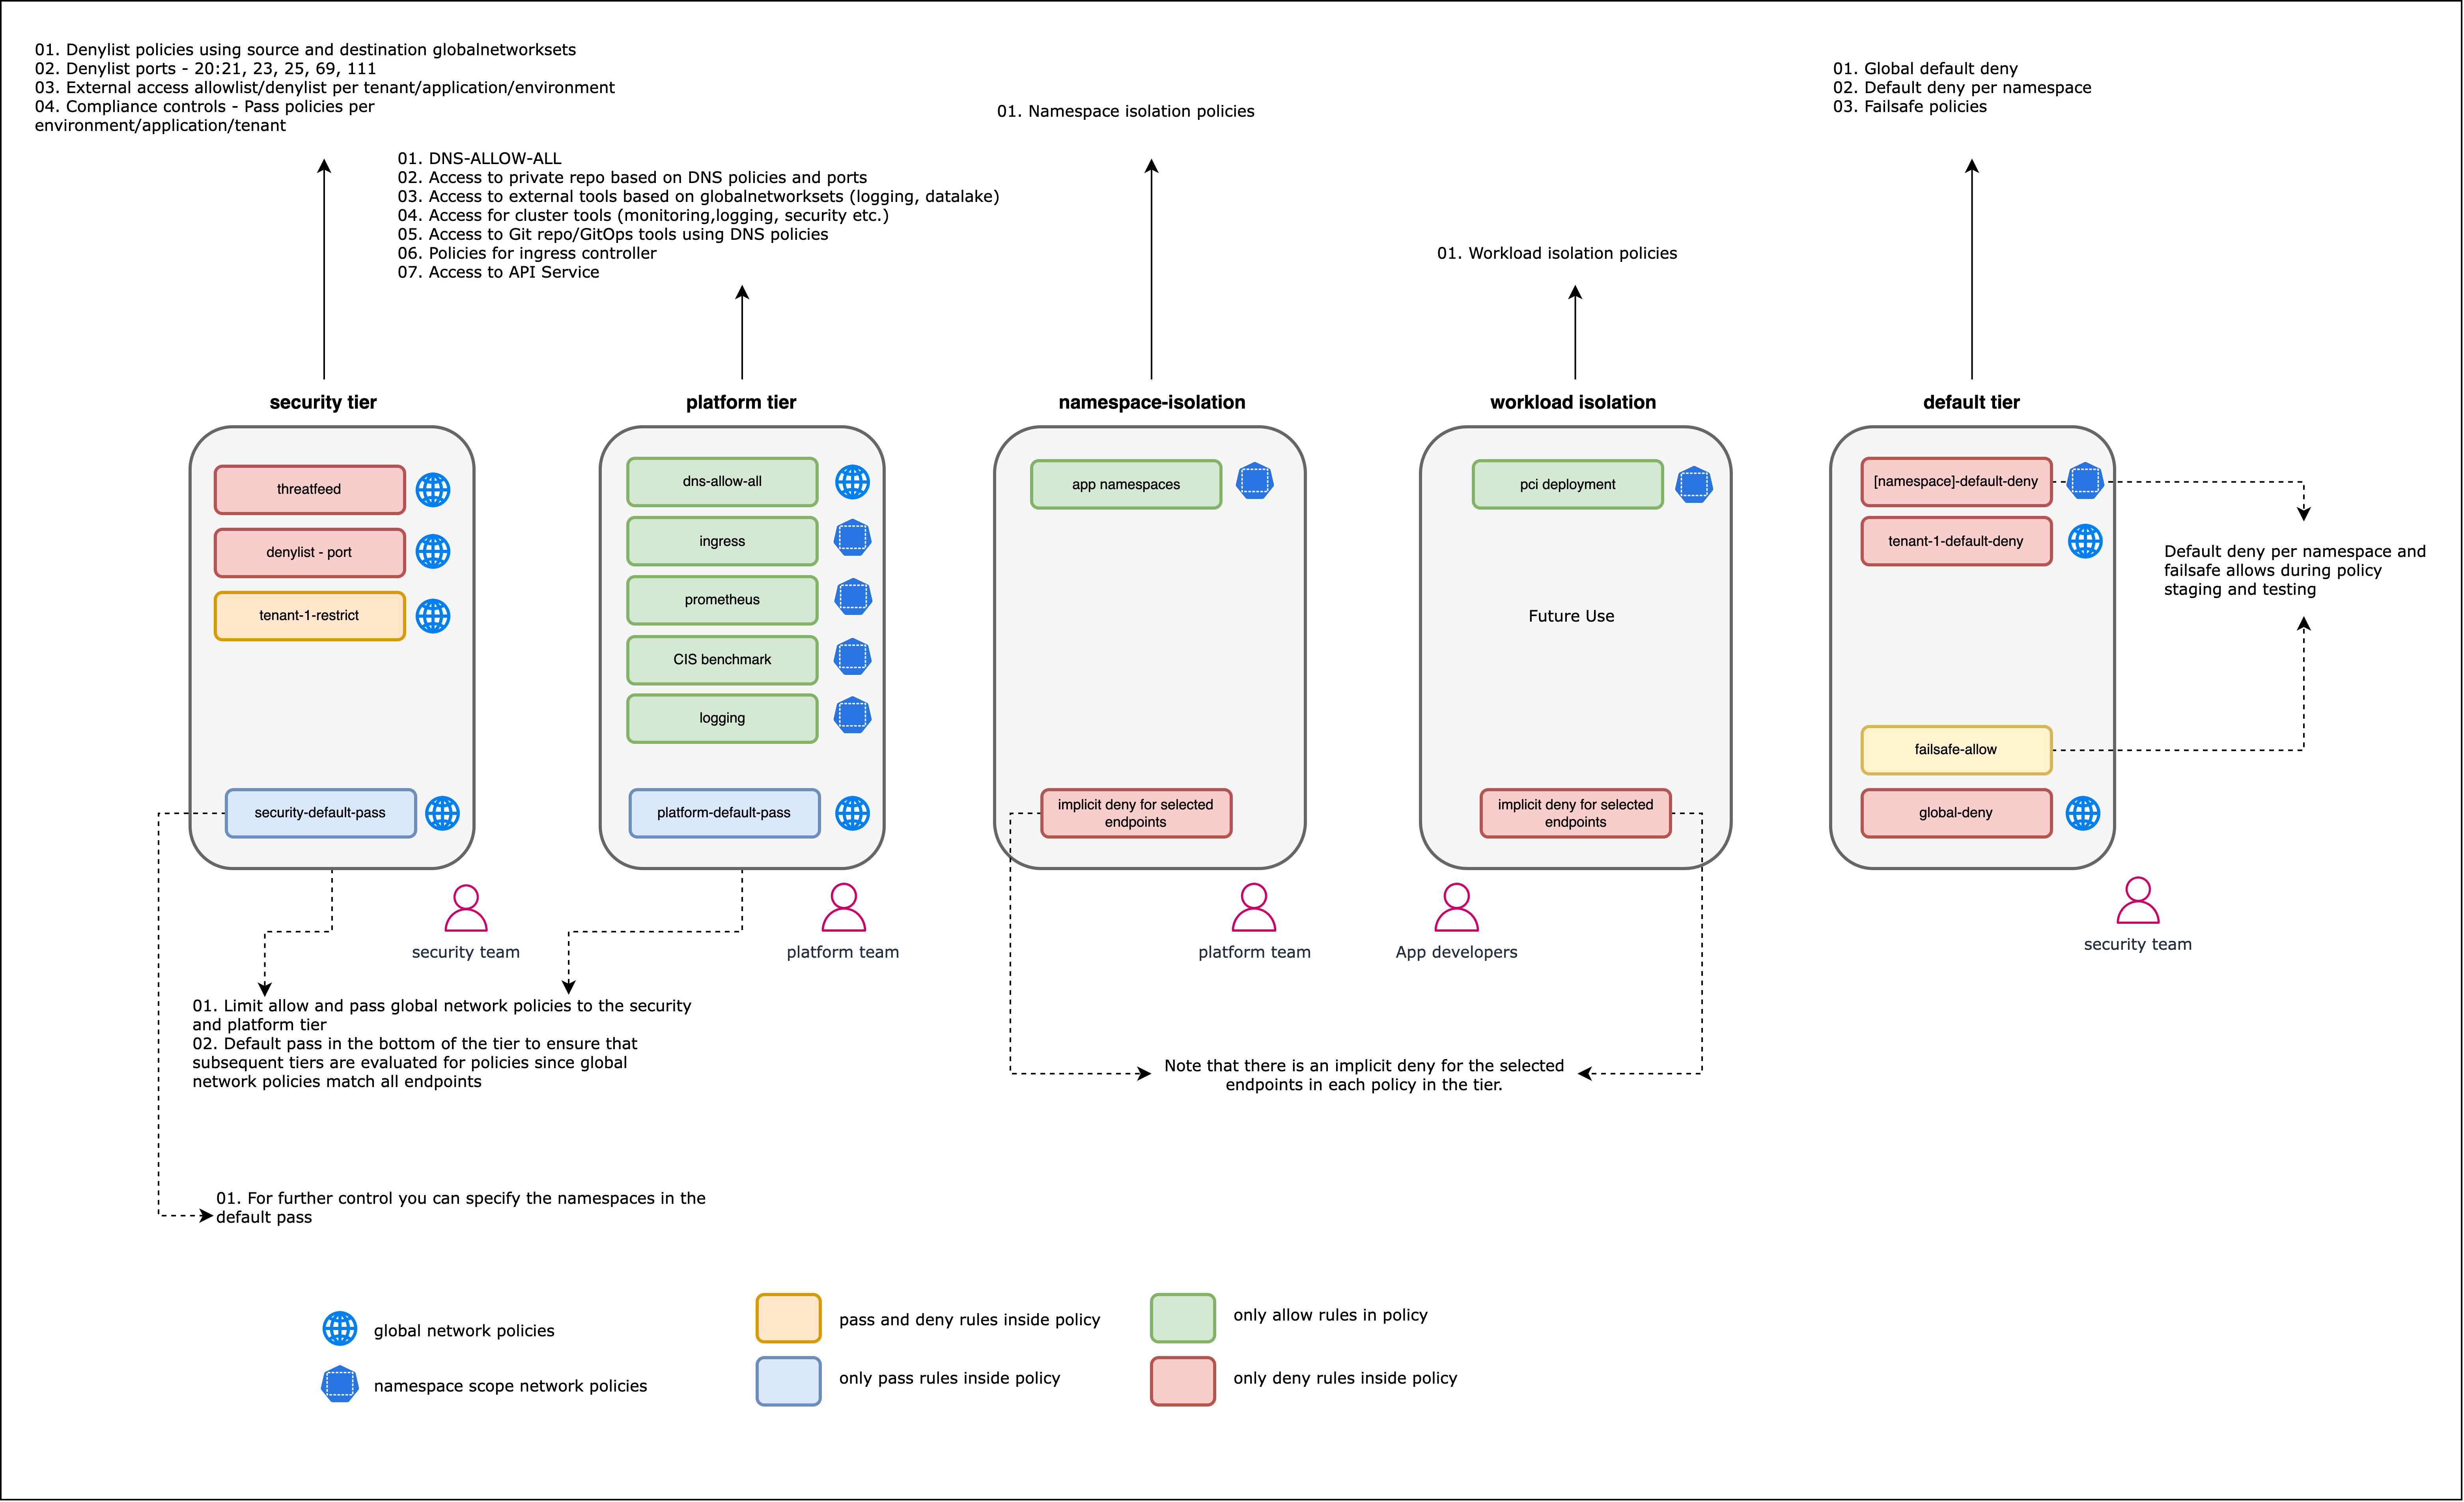
The following diagram shows how policies for different security domains are grouped into tiers in Calico Cloud or Enterprise.
Global network policies
Calico supports global network policy (kind: GlobalNetworkPolicy), a non-namespaced resource whose rules apply to any matching endpoints (pods, VMs, host interfaces).
Standard network policy is namespaced and only applies to workloads (pods, containers, VMs) within that namespace.
Global policies reduce the number of policies you need to write because they target assets across the cluster or multiple namespaces.
For example, you can create one default deny policy or one policy that allows traffic to system services like kube-dns.
Without global policies, you would need to duplicate Kubernetes network policies for each namespace.
Network policy management
Network policies can quickly become complex and hard to manage. Several tools help you understand what your policies are doing and make adjustments.
Policy ordering
In Calico, the order field controls how policies are evaluated, with lower values taking precedence.
Setting policy order matters when you have both action: allow and action: deny rules that apply to the same endpoint.
If no policies apply to a pod, all traffic to that pod is allowed.
If one or more policies with ingress rules apply to a pod, only the ingress traffic those policies allow is permitted.
If one or more policies with egress rules apply to a pod, only the egress traffic those policies allow is permitted.
Policy tiers
Calico Cloud and Calico Enterprise let you group policies into hierarchical tiers. Tiers enforce higher-precedence policies that other teams cannot override. Tiers are evaluated by order, and policies within each tier are also evaluated by order. In the UI, evaluation runs left to right, top to bottom. You can set RBAC on each tier to control who can view or edit it.
Calico Open Source does not support tiers, but you can use RBAC to control how different users shape cluster security.
Staged policies
Staged policies let you preview how a policy would affect traffic without actually enforcing it. You can apply them to both network and global policies.
Use staged policies to test traffic impact as if the policy were live, but without changing actual traffic flow. You can also see how a staged policy would affect existing traffic. By verifying that the right flows are allowed and denied before enforcement, you reduce the risk of misconfiguration and network disruption.
Implementing microsegmentation with network policies
Follow a structured, repeatable approach to implement microsegmentation. The process has four broad steps:
-
Identify the security domains you want to protect, who is responsible for them, and which services need access.
-
Define a policy model using your application's documented communication patterns or by analyzing traffic flows. Consider the scope (global or namespace), who will write and apply policies, and policy order (or tiers).
-
Author and deploy network policies. Once your allow policies are in place, stage a default deny policy. Start with a low-impact application or domain to learn the process before tackling critical security domains.
-
Re-assess flows and new applications that may need policy changes before you enforce default-deny. In Calico Open Source (which doesn't support staged policies), test default deny in a staging environment before enforcing in production.
Identify your security domains
When choosing which security domains to protect, consider your compliance requirements and how critical each application is. For more on compliance beyond microsegmentation, review our white papers. The right approach depends on your organization's requirements, security posture, and risk tolerance.
If you have critical applications, the effort to protect them outweighs the risk of a breach. This calls for fine-grained policies across multiple security domains: cluster, tenants, namespaces, and workloads. In a low-risk environment without sensitive data, namespace or tenant isolation may be enough.
Start with a low-risk application in a staging environment to learn the process before applying it to critical domains.
Consider:
- Compliance requirements
- How vulnerable your applications are to attack
- Your security posture (zero-trust requires stricter segmentation)
- How important each application or security domain is
Develop a policy framework
Once you've identified your security domains, start designing your network policies. Work from broad, high-level policies down to fine-grained ones. In Calico Enterprise or Calico Cloud, think in tiers and design policies tier by tier, from left to right across the policy board. Tiers on the left have higher precedence and apply to the cluster or platform. As you move right, tiers focus on specific namespaces or applications.
Use this diagram as a starting framework:
Before you write policies, you need to know how to target assets (labels, service accounts, or namespaces) and what rules to write based on cluster traffic:
Analyze cluster traffic
To define a policy model, you need to know the expected communication within each security domain and design policies to protect those domains. Consider:
- Will you use global or namespaced policies?
- Do you need to protect hosts (and configure that)?
- Who is responsible for defining policies for different security domains?
- What order should policies be applied in?
- Policy tiers, for Calico Cloud or Calico Enterprise users.
Policy models are easier to build when your application has docs that describe how microservices communicate, including protocols and ports. A shift-left approach puts the responsibility on developers who know the communication patterns and can write accurate policies.
If you use Calico Open Source and need help analyzing traffic, install a log collection tool like Fluent Bit and send logs to a processing tool like Elastic. This gives you layer 2–3 logs to build policies from.
Calico Cloud and Enterprise users have several tools to analyze flows:
Dynamic Service and Threat Graph shows a visual map of workload communication. You can view flow logs with metadata for source and destination endpoints, plus any policies that apply and their outcome.
Flow Visualization shows traffic volume across the cluster in a 360-degree view. FlowViz and Service Graph together show what flows exist within a cluster or namespace, endpoint metadata, and applied policies.
Elasticsearch and Kibana are included with Calico Cloud and Calico Enterprise. Use them to explore logs and get insights into traffic volume, performance, and other cluster operations. Log data is also available in custom dashboards.
Label your assets
Network policies are identity-aware, so you'll usually target assets using labels. Calico global network policies can also target service accounts or namespaces. Before you write any policies, make sure all assets are labeled correctly so that selectors target the right assets at the right level.
For example, in a demo storefront, every pod in the hipstershop namespace has a compliance label and an app label that identifies the service.
This lets you write multiple policies.
One policy can allow communication between all pods with a shared label.
Other policies can use the app label to target specific workloads with fine-grained ingress and egress rules.
This gives you flexibility to protect whichever security domains need it.
When designing and applying labels, you should:
- Design labels as part of the identification step, with a hierarchy that matches your security domains.
- Use label prefixes to classify by security domain. Prefix labels with the domain (tenant, application, namespace, or endpoint) and use key/value pairs that clearly represent each one.
- Don't use reserved label keys like
kubernetes,tigera, orcalico. - If you use a CI/CD pipeline, verify that the right labels are applied and add label governance checks. This ensures new deployments are secured from the start.
More information is available on labeling best practices.
Write your policies
By this point, you know which policies to create, their order and tier, and which labels to use as selectors.
Before you write policies, review the best practices for: Calico Open Source, Calico Enterprise, Calico Cloud.
Calico Enterprise and Calico Cloud have features that make writing policies easier and faster:
Graphical Policy Editor: Calico Cloud and Calico Enterprise provide a GUI to create, edit, and delete policies. You can download GUI-created policies as YAML.
DNS Policies: Use external IPs or network rules to limit traffic to or from non-Calico workloads or external networks.
Automatic policy recommendations: Calico Cloud and Calico Enterprise can automatically generate policies to isolate namespaces. You can also generate recommendations for specific workloads for more granular segmentation. This helps platform operators implement namespace isolation at scale, even without deep knowledge of how workloads communicate. Calico analyzes flow logs from workloads and recommends staged policies for each namespace. All recommended policies are staged by default, so you can preview their impact without affecting traffic. Enable policy recommendations per cluster. It may take time for Calico to learn traffic patterns before it provides recommendations.
All versions of Calico support both Kubernetes network policy and Calico network policy.
Deploy network policies
In all products, you can apply policies using the CLI. In Calico Enterprise and Calico Cloud, you can also stage or enforce policies through the web console. Check whether policies have been applied with these commands:
kubectl get networkpolicy
kubectl describe networkpolicy <networkpolicy-name>
or
kubectl get globalnetworkpolicy
kubectl describe globalnetworkpolicy <globalnetworkpolicy-name>
Apply policies in an order that won't disrupt your applications. Calico network policy supports policy ordering during traffic evaluation. Calico Enterprise and Calico Cloud also support hierarchical tiers.
With Calico Open Source, define the policy order in the spec and apply policies in the right sequence.
In Calico Enterprise and Calico Cloud, the policies board shows all staged and enforced policies in their evaluation order.
Make sure you understand how policy endpoints match across tiers.
- Apply broad policies first, targeting general security domains.
- Verify they work before applying narrower policies at the application or workload level.
- Make sure policies allow traffic to critical services and control plane services like kube-dns.
- Confirm policies are in the correct order using CLI tools or the policy board.
- Enforce any staged policies.
Enforce a default deny policy
By default, Kubernetes allows all traffic that isn't restricted by a policy. A default deny policy blocks all unwanted ingress and egress traffic. You then create allow policies for traffic your pods and services need. Pods without a policy (or with a wrong one) are blocked from all traffic until you define the right policy.
Calico global network policies are not namespaced — they affect all pods that match the selector. Kubernetes network policies are namespaced. To get the same effect with Kubernetes policies, you would need a default deny in every namespace.
Make sure your default deny does not target system pods that are critical to cluster health. This policy correctly excludes system pods from the global deny rule:
apiVersion: projectcalico.org/v3
kind: GlobalNetworkPolicy
metadata:
  name: deny-app-policy
spec:
  namespaceSelector: has(projectcalico.org/name) && projectcalico.org/name not in {"kube-system", "calico-system", "tigera-system"}
  types:
  - Ingress
  - Egress
  egress:
   # allow all namespaces to communicate to DNS pods
  - action: Allow
    protocol: UDP
    destination:
      selector: 'k8s-app == "kube-dns"'
      ports:
      - 53
  - action: Allow
    protocol: TCP
    destination:
      selector: 'k8s-app == "kube-dns"'
      ports:
      - 53
Calico Enterprise and Calico Cloud have a hidden tier with policies that secure Calico components. These policies take precedence over all user-created policies. Don't modify or bypass them.
Calico Open Source: Enable default deny for Kubernetes pods
In Calico Cloud and Calico Enterprise, the staging policy tool helps you find incorrect or missing policies. A global deny rule also helps prevent lateral attacks.
Create a global default deny policy after you write your allow policies. Use staged policies to verify that allowed traffic works as expected, then lock down the cluster. Best practice:
- Create a staged global default deny policy. It shows all traffic that would be blocked if the policy were enforced.
- Create allow policies for each blocked flow until no connections are denied.
- Convert the staged policy to an enforced policy.
Steps to enforce default deny:
- Create your allow policies. You can't predict everything, but put as many as you can in place.
- Create a default deny policy.
If global, create one policy.
If namespace-scoped, create one per namespace.
- In Calico Enterprise or Calico Cloud, stage it through the UI or set
kind: StagedGlobalNetworkPolicyorkind: StagedNetworkPolicy. - In Calico Open Source, apply the default deny in a non-production environment first. You can add a 'log' action to record flows that hit the deny in syslog.
- In Calico Enterprise or Calico Cloud, stage it through the UI or set
- Test your application or services. Verify that all policies work as intended and nothing is broken.
- Once everything checks out, enforce the default deny in production.
Monitor and fine-tune your policies
After your policies are in place, monitor traffic and performance to make sure they work as expected.
There are several ways to check if your policies are effective.
Review the policies board
In Calico Cloud and Calico Enterprise, check the policies board first for misconfigurations. You can spot policies that deny traffic or have no endpoints assigned to them.
Use observability tools
Calico Enterprise and Calico Cloud include visual tools to find misconfigured policies: Service Graph, FlowViz, and the policy board. They also include Kibana as a frontend for Elasticsearch, which gives you richer dashboards and log analysis. For a walkthrough, see this video series.
Test connectivity with test pods
Deploy test pods in different security domains and check if they can reach each other. Label these pods to mimic other services and trigger specific policies. Use tools like curl or netcat to test connectivity.
The results tell you whether a policy correctly denies or allows traffic. Combine this with flow logs or observability tools for a fuller picture.
Read the logs
Calico supports a log action in network policies. Calico Enterprise and Calico Cloud collect a wide range of logs you can use to investigate flows and validate policies.
Simulate your application or service
Test your deployed application thoroughly to find any issues caused by the network policies.
If you need to create or edit policies, refer to the sections above.